|
|
|
This paper has been presented at the EPRI Phased array inspection seminar - Portland, Main, USA - Septembre 98
|
|
|
The design of ring arrays had to take into account many constraints and especially a high degree of miniaturisation and a high degree and mechanical robustness. Piezocomposite technology has proved to answer to this challenge: a high electroacoustical efficiency to provide a high signal/noise ratio, the ability to shape the piezocomposite elements and create mechanical focusing in the transverse plane without any lens or prism, a high resistance to mechanical impacts and thermal shocks.
An invitation for tenders was made in 1991 for the design and manufacture of a steam generator tube inspection system that had to feature a performance level never attained with the existing techniques.The length, that is greater than 90 m and the helical geometry of the tubes to be inspected (see figure 1), the presence of elbows with a 125-mm radius to be overcome and the presence of sodium on the outer wall make the classical inspection techniques inappropriate.
Eddy currents, indeed, are disturbed by the presence of sodium remains, whereas the use of ultrasonic rotating probes does not allow the use of long tubes in the required industrial conditions: the displacement speed is limited to approximately 3 metres per hour, i.e. one tube every 30 hours, whereas the inspection time of a tube should be in the neighbourhood of one hour.
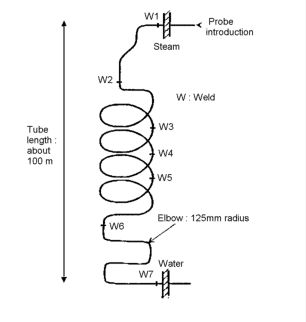
figure 1. Steam generator tube
An alternative solution had therefore to be studied.
FRAMATOME, designer and manufacturer of GV, has suggested as a response a new, patented design of ultrasonic probes. This system, that uses multi-element ultrasonic probes developed by IMASONIC, features the advantages of a high-speed inspection, that is typical of the eddy current techniques and the good sensitivity for the detection and characterisation of defects, that is typical of ultrasonic techniques.
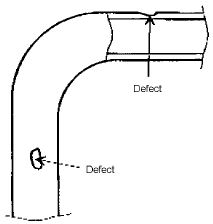
The defects to be detected and characterised in terms of size are twofold:Type-1 defects, defined by the lack of thickness of the tubes, that can show local lack of material on their outer wall. These defects are due to a potential sodium-water reaction.
Type-2 defects, that are circumferential cracks that can appear on the inner wall of the tubes. These defects are generated and spread in service from the inner wall of the tube. These defects can preferably appear in the neighbourhood of the welds that connect the various sections of a tube.
The detection of these defects is essential if we consider that a leak on a generator tube would directly put into contact under-pressure water and sodium.
 |
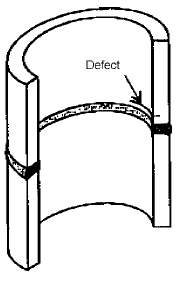 |
| figure 2. type 1 defects | figure 3. type 2 defects |
The following principle has been accepted for defining the probes and especially the ultrasonic head.
The ultrasonic head:
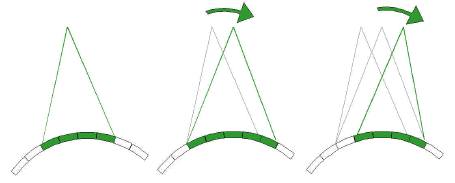
It is made up of 80 elements arranged in ring arrays oriented towards the outside. Various groups of adjacent elements are excited simultaneously, thus creating ultrasonic openings. The beam rotates by electronic commutation, allowing the beam to be angularly shifted between two successive shots. As openings of 4 and 5 elements are used alternately, a half-element angular shift is simulated between two shots and 160 shots are carried out for each tube cut.
| Shot n | Shot n+1 | Shot n+2 |
 |
||
| 4 elts | 5 elts | 4 elts |
A tube can therefore be inspected by 360° without any mechanical rotation. The examination of the entire inner surface of a tube is therefore carried out by combining the electronic scanning by 360° and the mechanical displacement of the probe.
Delay laws applied to the elements that make up the active opening during a shot are used to focus the beam into the radial plane of the tubes. The mechanical focusing of the elements is used to focus the beam in the axial plane of the tube.
 |
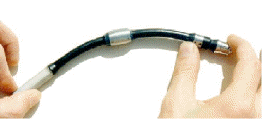 |
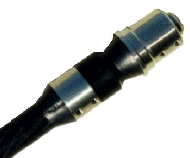
| figure 5. Ultrasonic head | figure 4. Probe head overview |
The probe
Given the length of the tubes to be inspected and the number of channels to be driven, the probe head is made up of various elements in addition to the ultrasonic head, including an ultrasonic head excitation impulse-generating stage, a pre-amplifying stage for signals received from the ultrasonic head, and a signal multiplexer.
The ultrasonic head uses a piezo-composite material.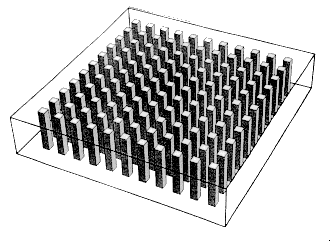 |
figure 6. Schematic
representation of a piezo-composite plate with a 1-3 structure - After W.A. SMITH |
The structure of these materials, illustrated on figure 6, is made up of thin ceramic rods (which present a mechanical continuity following one dimension of the space) embedded into a polymer matrix (which presents a mechanical continuity following three dimensions of the space). Used as plates and equipped of electrodes on their main sides, these materials have many advantages compared to piezo-electrical transducers generally used in the field of Non Destructive Testing.
Beyond the properties and characteristics described in table 1 below, piezo-composite materials feature mechanical properties that allow them to be shaped so as to generate focused ultrasonic beams or allowing them to withstand high mechanical or thermal constraints.
|
table 1.Comparative chart of the electroacoustical properties for different piezo-electrical materials |
||||
|
Material |
Lead metanobiate |
PZT |
PVDF |
1-3 composite |
| Acoustical impedance (Mray) | 20 | 30 - 32 | 4.5 | 8 - 12 |
| Coupling coefficient | 0.3 | 0.45 - 0.5 | 0.2 - 0.3 | 0.5 - 0.7 |
| Dielectric constant | 300 | 250 - 2000 | 6 | 200 - 600 |
| Density (g/cm3) |
6.2 | 7.8 | 2 | 3.5 - 4 |
High sensitivity
The configuration of the probe - with a part of the driving electronics and a multiplexer near the ultrasonic head implies a low excitation level between 10 and 15V.
The output of the acoustic head should be high enough to generate a sufficient power level in order to successfully carry out the inspection operation.
In addition to constraints relating to the sensitivity level, the probe should also meet with a constraint in terms of sensitivity homogeneity: homogeneity over the 80 channels should be better than 6dB, and homogeneity over the 160 openings of 4 or 5 elements should be better than 4 dB
Tailor-made focusing
Three types of ultrasonic heads have been studied with different purposes in terms of detection.
A head that generates a beam in the radial plane of the tube, in order to allow the detection of type-1 defects (lack of thickness). The elements of this ultrasonic head have been shaped according to a concave, aspheric shape specially adapted to the required focusing.
Two heads that generate a beam that drives the tube's wall with a non-zero incidence, one towards the front of the probe and the other towards to back. These two heads are used to detect and assess in terms of size type-2 defects (circumferential inner cracks). The elements of both heads have also been shaped according to an aspheric, pseudo-conical profile especially adapted to the required focusing.
In both cases above, the piezo-composite technology is used to shape elements with the aim of totally meeting the focusing objectives of the ultrasonic beam. In addition, there is no need to use a lens, whose attenuation at operating frequency would have been a brake upon the objectives set in terms of sensitivity.
High damping level
Given the thickness of the tubes (£ 3mm), a high damping level of signals is required, especially for the detection of lack of thickness, that should not be hidden by the tube's inner wall echo. The objective for damping, for the time signal, is <0.35 µs (-14dB).
In this case, the properties of the piezo-composite materials have allowed a very little backing thickness to be reached and, while reaching the damping objectives, to meet with the strong constraints in terms of miniaturisation imposed to the probe.
A miniaturised acoustic part
Given the inner tube's diameter to be inspected, the probe's constraints in terms of flexibility, and given the required water path for the ultrasonic beam before it enters the tube, the ring array made up of the 80 elements needs to be highly miniaturised.
The average ring diameter made up of the 80 active elements is in the neighbourhood of 11 mm, the height of the elements is in the neighbourhood of 5 mm.
In addition, an area should remain free in the middle of the ring in order to place the probe's mechanical strength elements.
Significant interelement decoupling
The use of electronic scanning and focusing implies that the various elements of the head are driven on an independent basis. To this end, a high acoustic decoupling of the various elements is required.
The set objective is -40 dB between two neighbour elements.
Adapting to the use conditions
The transducers have been characterised element by element, in order to check the operation frequency, elementary damping, element decoupling and sensitivity homogeneity.In addition to the electroacoustic performance objectives, the probe should also withstand use conditions including:
- Vibration due to the penetration of the probe in the tubes
- A use temperature from 10 to 50°C
- Pressure of water that is injected in the tubes to be inspected.
- Traction stress required to make the probe advance in the tubes.
More particularly, the probe should withstand a 24-hour soaking test in water under 6-bar pressure, a 200-N traction test and a cycle at a temperature of 50°C without its performance showing a significant variation (<3dB).
The table 2 below summarises the results obtained in average on all probes manufactured.
|
table 2. Results of channel circular probe characterisation |
||
|
Parameter |
Performance objective |
Measurement result |
| Sensitivity
homogeneity (dB) |
<6 dB | 3 to 5 dB |
| Damping (µs) |
0.35 | 0.15 to 0.30 |
| Centre
Frequency (MHz) |
10 to 13 | 11 to 12 |
| Cross coupling (dB) |
<-40dB | -30dB to –50 dB |
The performance objectives are therefore attained, with the exception of inter-element decoupling that is lower than the set objective for certain probes.
Experience has then shown that the coupling level obtained was sufficient to successfully carry out electronic scanning and focusing.
The technical performance and inspection system endurance have been demonstrated on the scale-1 model of a steam generator tube that showed artificial and natural defects located at approximately 90 m from the probe's insertion end. The inspectability of the entire tube has been demonstrated with the following technical performance:Type-1 defects
All depth defects higher than or equal to 0.26 mm (10% of the tube thickness) and with a surface greater than a disc of 1.5 mm diameter have been detected and their depth assessed with a * 0.1 mm accuracy. The corresponding acquisitions are carried out at a speed of 50mm/s, allowing a complete tube to be inspected in 30 minutes.
Type-2 defects
All defects located on the edge of a weld and that are deeper than 0.5 mm (20% of the tube thickness) and longer than 1.5 mm are detected by the automatic analysis of the acquisition files, carried out at a speed of 50mm/s. Any detected defects will be re-inspected locally at an acquisition velocity of 2 mm/s. The analysis of these specific files has contributed in assessing the size of all defects first detected with an accuracy better than ± 0.26mm
Endurance tests
The use of the multi-element ultrasonic inspection technique for inspecting steam generator tubes is a significant technological jump ahead, that was mainly made possible by the use of the piezo-composite technology.A complete probe carries out 150 to-and-fro movements, thus covering almost 30 km. Checks made on this probe following this test have shown that its nominal characteristics were not affected.
The qualifications of the ultrasonic method in 1995, then of the whole inspection system on a scale-1 model in 1996, an finally the in-service inspection of 36 tubes (10% of all tubes in a steam generator) in 1997 have demonstrated the practicability of this technique at an industrial scale.
J. Poguet / G.Fleury - Imasonic S.A. - France
O. Burat / G. Moreau - Framatome - France
W.Arden Smith. "Piezo-composite materials
for acoustical imaging transducers". 21st International symposium on
acoustical imaging, March 1994
O. Burat, G . Moreau, J.P. Carmona. Framatome. "Inspection des tubes de générateur
de vapeur de Superphoenix par sonde ultrasonore multiéléments"
. COFREND congress in Nantes, September 1997.